Monday, December 6, 2010

Harvest Salad


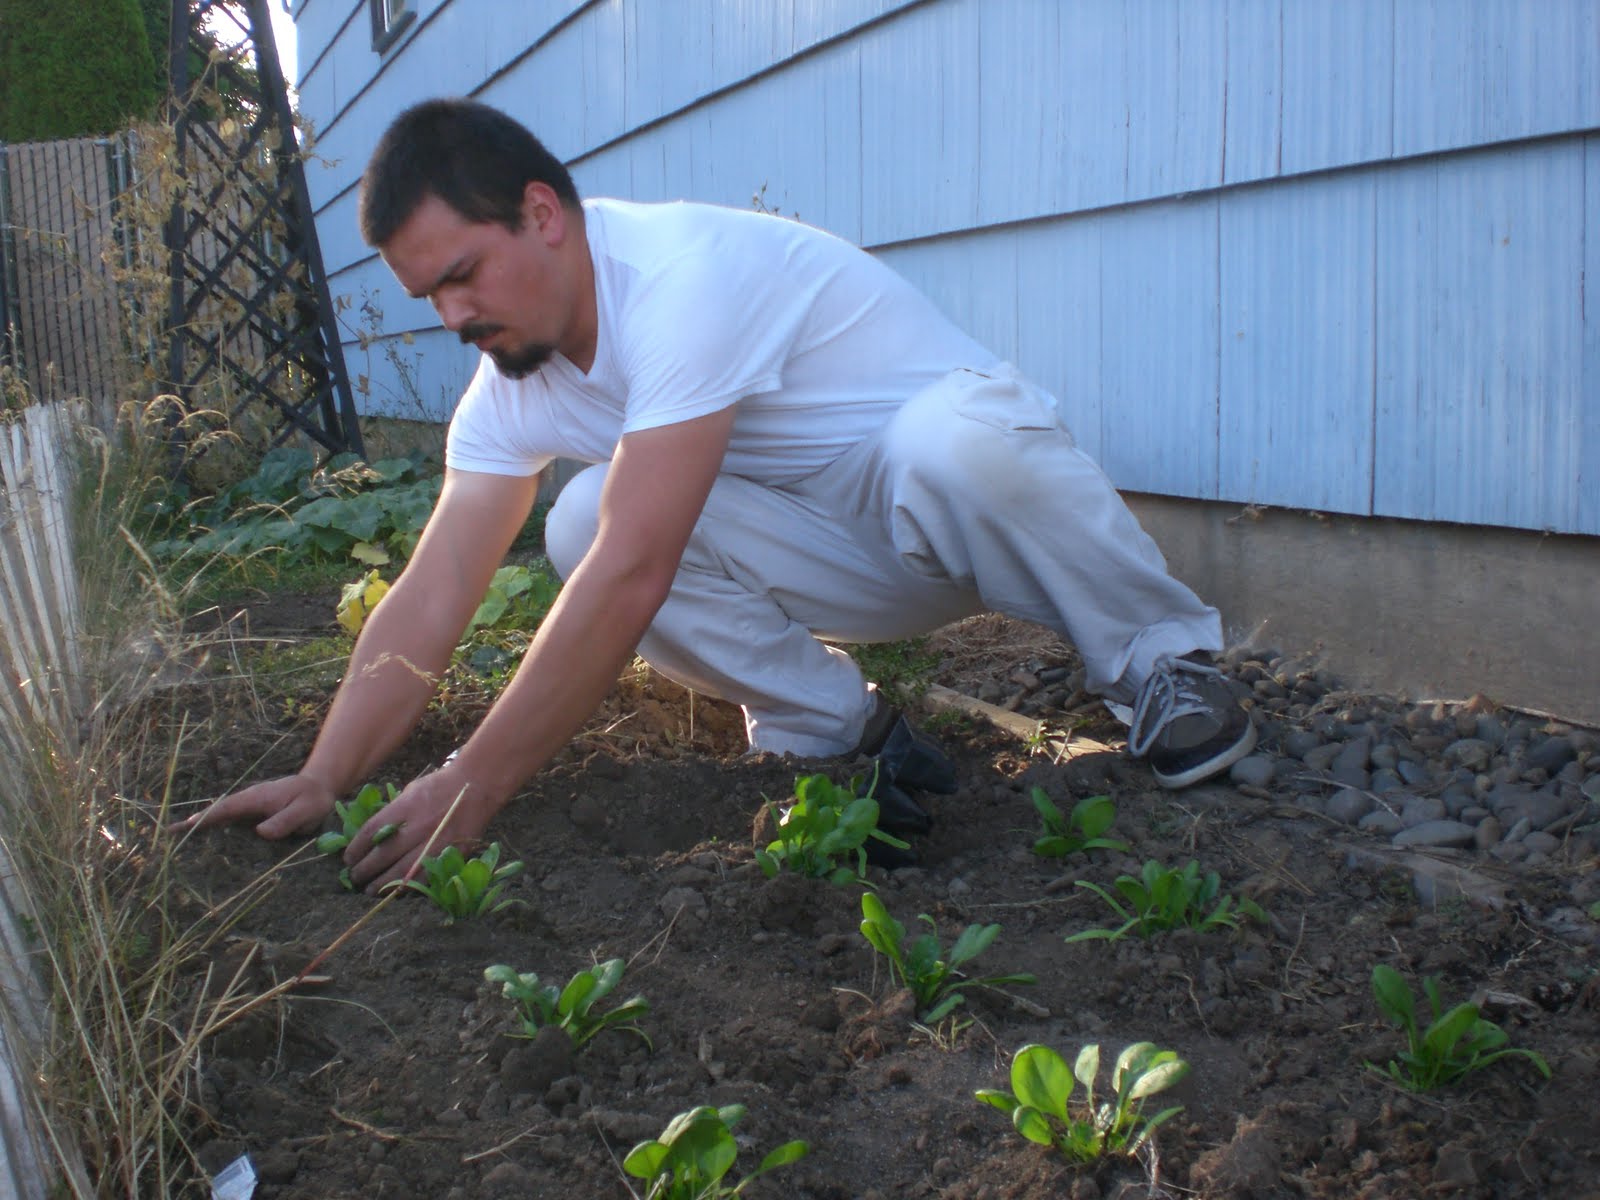
Winter is the time for eating slow cooked meals, but who is to say that you cannot accompany them with a wonderful fresh salad. Let me just say that I am not a big fan of salads, however, I love this salad. I love the sweet raspberry vinaigrette made with summer raspberry jam. I love the fall crisp apples, and being able to use lettuce from my winter garden. I thank my wife Rebecca for making this and getting me to try it, even though she knows that it is not always easy for me to eat salads. Hope you enjoy it.


Ingredients

  • 1/2 cup chopped walnuts.
  • 1 bunch spinach and/or available lettuce.
  • 1/2 cup dried cranberries.
  • 1/2 cup crumbled goat cheese, you can substitute for blue cheese.
  • 2-3 sliced thinly sliced apples depending.

  • 2 tablespoons red raspberry jam (with seeds)
  • 2 tablespoons red wine vinegar
  • freshly ground black pepper to taste
  • salt to taste

Directions

  1. In a large bowl, toss together all of the first ingredients.
  2. In a small bowl, whisk together jam, vinegar, pepper, and salt. Pour over the salad just before serving, and toss.

Thursday, November 25, 2010

Making Sweet Potato & Yam dog treats

Here is a video on making sweet potato and yam human/dog treats. I have been making these for a couple of years. Right now sweet potatoes are on sale in every store and they also happen to be as local as they are going to get. This is the time to get the cheapest and sweetest sweet potatoes of the years. This is a treat that even I enjoy. I love eating these while watching TV and they make great hiking and backpacking treats for both humans and dogs.

Tuesday, November 23, 2010

Poached Pears and Vanilla Ice Cream

This is a recipe from The Food Network courtesy of Giada De Laurentiis, one of my favorite cooks.

This is the perfect recipe for the time of the year. Right now, bosc pears are local and abundant. This dessert goes perfect with a sweeter wine.


There is a direct link at the bottom of the post.

Ingredients
* 1/3 cup apple juice
* 1/3 cup firmly packed dark brown sugar
* 3 tablespoons unsalted butter
* 3 firm Bosc pears, peeled, halved, cored (about 1 pound)
* Vanilla ice cream, for serving

Directions

Preheat the oven to 400 degrees F.

Arrange the pears cut side up in an 8-inch square glass baking dish. Whisk the apple juice and sugar in a small heavy saucepan over medium-high heat until the sugar dissolves. Whisk in the butter. Pour the sauce over the pears. Bake until the pears are crisp-tender and beginning to brown, basting occasionally with the juices, about 35 minutes.

Spoon the pears onto plates. Top with ice cream. Drizzle with any juices and serve.

The pears can also be served frozen. To do so, cool the pears, then place them in the freezer until frozen solid, about 8 hours.

Link to site

Saturday, November 6, 2010

Making Apple Juice


This week, I got the chance to visit the Dickson family. I am blessed to have two of their wonderful kids in my classes. Every year the Dickson family puts away about 250 quarts of apple juice. They get their apples from windfalls from farms close to home. They are a wonderful example of how more of us should live.

Daniel Dickson is the main presser and you can tell just buy looking at what I have begun to call his "juice arms". Mrs. Dickson says that she loves the fact that they get to do this as a family and from the time I spent with them pressing juice, it was easy to see how much fun they have. Pressing juice is a lot of work but it is very much worth it.

I could not help myself and I created a little video from the footage I took while I was there.


Sunday, October 31, 2010

Late October

Had one of my very last cucumbers from our garden today. Who would have thought that all this water was good for them. They are crisp and taste wonderful. The only thing I knew would do it justice was a fresh made hummus made with home made beans. I was even able to use some of my very last cherry tomatoes.

Our winter garden is doing very well and we have been picking lettuce to put on sandwiches, the broccoli looks like it will make it, the spinach should come back from all the slug bites, and the swizz chard is still surviving. For some reason some of the onions I planted in March have resided to finally come out. I think this is because they are finally getting the required moister. I will probably have to eat them small.

This picture at the bottom has a plot that I am preparing for next year. Let me know if you have questions on how to go about it.  The seemingly clear plot has carrots and fava beans.

Saturday, October 23, 2010

Food Preservation Journey

So where should I be in my journey? Here in Oregon we are hitting low temperatures of about 45 and highs in the low 60s. There are apples, pears, and squash in abundance. I still have tomatoes in my garden,  and in the valley wine grapes are just beginning to be picked.


What am I doing? I am almost done with everything. At this point I am bartering for fruit like figs, I think I will pick the last batch this next week. This is a great time to be canning apple sauce, dehydrating pears and apples, and gathering things such as honey and soap from the farmers markets before they close for the year.

What should I be excited about now? I love the change of seasons. If you planted a winter garden you will have greens for a while longer. Winter will be the time to relax and enjoy all the wonderful produce you stored. You can use the time to reflect on what you did right and to plan on the changes you will make for the coming year. This is the time to make as many things as you can in the oven, to open a nice can of peaches, or a jar of honey or jam to put of fresh scones. Its the time to cooked slow meals and to open a nice bottle of wine.

I get as excited about winter as I do about summer. It is never easy to adjust from one season to another, but I find a lot of joy in this journey of a yamhill squirrel.

Monday, October 11, 2010

Popcorn

My friend Paul Adams and I did a little bartering with popcorn and dried fruit. Paul Adams runs the Seseme Street CSA here in McMinnville and this year he grew popcorn. In case you do not know, CSA stands for Community Supported Agriculture. Paul grows food in his city garden and families from the community pay a yearly fee to be a part of the bounty. It is amazing to see how much food a person can grow in their front yard.

As for the popcorn, I love making popcorn. Talk about growing your own snacks. I have not grown popcorn in my garden, but the success Paul had is making me want to try this coming year.

Paul and his lovely daughter Lucy :)

Tuesday, October 5, 2010

Mushrooms

It's mushroom time. Last week Lincoln City had their annual cook-off. My wife's family and I always go to this event, it is always very popular. We have even gone on the morning mushroom hunt with an expert guide. The hunt is free and all of us found some mushrooms.


I must admit, I am very much about the hunt, I just love it. I don't do a lot with mushrooms, I usually just cook them with eggs for breakfast. I also like to dehydrate them in the dehydrator or in the fridge. Yes, if you leave them in the fridge for a few days they will loose all their moister, just like garlic.  I use the dehydrated mushrooms when I am making soups (specially Asian soups).

This is the time to look around and find a mycological society  near you area. I know we have at least 3 here in Oregon and you will be surprised to how many you might find near your area.

Saturday, October 2, 2010

Harvest Time

This is a great time to go to your local farmer's stand and pick up some great vegetables and fruits. I know that sometimes people say that eating locally can be expensive, we were able to buy all this for about 60$. This is a lot of food. A lot of the apples, plums, and pears will be dried. The green beans will be blanched and then frozen. The dried beans will be taken out of their pods and then stored in kerr jars to cook later in the winter. The tomatoes will be canned and used to make tomato sauce later in the year.

This was a very productive trip. I know that it seems like a lot of work but later in the year it really pays off. My wife and I usually only go to the store for things like grains, flour, meat, and dairy. That's not to say that I stay away from avocados and chocolate. This saves a lot of time and money. Hope you will take on the challenge and put something away for winter this weekend. Have fun squirrlin'

Monday, September 27, 2010

Figs

Thanks to a wonderful friend, today I had my first figs. I look forward to them with excitement every year. I just love figs. The question I get with figs is, how do you tell they are ripe? Usually the fig will begin to drape over a little and become soft. This variety changes to a shade of purple and it is easy to tell when it is ripe. There are other varieties which turn a slightly lighter green but still become nice and soft to the touch.
The other question I get is how do you preserve them? Well I usually don't. I do cut and dry a few just for fun but figs are not easy to get in big quantities and they are so good I just can help but to eat them fresh.

Sunday, September 26, 2010

Dehydrating Peaches

Dehydrating is the best way to preserve peaches. You don't need to skin them or do any thing to them besides taking off the pit and cutting. How you cut is up to you, I like to cut them into peach rings and a little less than a quarter of an inch but don't make the thickness a science. Once cut, you put them on the dehydrator trays and leave them for about 12 hours. If you like them a little soft, you might have to store them in the freezer. I like them very dry and I keep them in canning jars in a dark room. This is a great way to re-use the lids that you can't use for canning (you are only supposed to use them for canning once).

This week I was able to get a hold on a lot of peaches that were on their last day. I had 20 dehydrator trays all going at once just to make sure non of the fruit went to waste. It must have only taken me about 30 minutes to get them all cut.

Like a lot of my fruit, I will keep half of what I produced and I will give half back to the person who provided me with the fruit. This way no money is exchanged and everyone comes out a winner.

This is a picture of the three jars that I am keeping for myself.

Wednesday, September 22, 2010

Canning Corn


In order to can any vegetable, you need to have a pressure cooker. A pressure cooker is necesary due to the low acidity of vegetables. The only "vegetable" you can safely can without a pressure cooker is a tomato.

In this example, I am using the "cold pack" canning method. That means that the item being canned enters the can cold and a hot liquid is added. In this case the liquid happens to be lightly salted water.

These are small jars and only needed 15 minutes in the pressure cooker but the time depends on how big your jars are.

I guess this might be a good time to tell you that there is nothing to afraid of when it comes to pressure cooking. I too was not too sure the first
time I used it but now I feel very safe around it.

The following is a great site that will give you all the information you need to know in order to can corn. I wish you luck in your squirrel endeavors.


http://www.pickyourown.org/howtocancornrawpack.htm


Sunday, September 19, 2010

My Fall/winter Garden

This year, I decided to finally try my hand at winter gardening. I went to Kramer's, which is located here in McMinnville Oregon, and found that they had a wonderful little cold crop section. Cold crops are crops that do not require a green house. Some of the starts that I bought were broccoli, cauliflower, spinach, lettuce, and swizz chard. I am also interested in growing some bok choy, which did very well in early spring. The people at Kramer's told me that they get their deliveries on Wednesday and they should have more things such as cabbage and brussels sprouts. I used coco mulch to try and keep away slugs.

If you have any suggestions on other crops I could grow please comment below.


Coco mulch is bad for dogs and as you can tell on the picture they like it. Make sure that you keep the mulch out of areas that dogs frequent.


Tuesday, September 14, 2010

Preserving Basil and Making Pesto

This is a great method for preserving herbs like basil. This recipe will save you a lot of time when winter comes, and its a great way to relive summer. My wife and I use this pesto through much of winter. We make pasta and add the frozen pesto cubes to the pot to thaw. You can also add a nice Italian sausage to the pasta to complete the meal.

I hope you enjoy the video.


Sunday, September 12, 2010

Drying Herbs


Many of us grow herbs in our gardens. Herbs are great to dry for winter because you do not need a dehydrator. On a nice warm day, you can put your herbs in a flat pan in your car and they will dry during the day. I have done this with mint, basil, and with parsley.

You can also dry leaves for tea during the winter. Many people don't know that raspberry blackberry, and blueberry leaves make great tea. You can also dry lemon balm, and chamomile.

Friday, September 10, 2010

Canning Apple Sauce

This is the time of the year to make and preserve apple sauce. I love opening a jar of apple sauce to put on my pancakes. Apple sauce is also great for baking, usually substituting for eggs as a much healthier binder.

If you are not familiar with canning, this is a great way to start. There are many tools out there but the most important ones are a 5 quart pot for cooking your fruit, and a 7-10 quart pot for the canning lined so that the jars are not touching the bottom, I usually use the small lid rings but you could use a steamer basket.

It is important to sanitize your jars and lids. I put my jars in the dishwasher and use the heat dry setting.

I have included a video that will take you through the steps of making apple sauce. Please take the time to watch it through before you start. 


Wednesday, September 8, 2010

Dehydrating Plums

Dehydrated plums are great, they are nothing like what you get at the store. Like apples, plums do not require any special treatment, you just cut them and put them on the dehydrator. I have made a small video that will take you through the steps and will show you how they should look when they are done. Let me know if you have any questions.

Excalibur 3900 Deluxe Series 9 Tray Food Dehydrator - BlackNesco FD-75PR 700-Watt Food Dehydrator


The video cuts off at the end and should have said "The ones that are not completely dry... I just save and I dry later." 

Sunday, September 5, 2010

Dehydrating Apples

Dehydrating apples is the best place to start when you are new to a dehydrator. You can use any kind of apple, some are sweeter than others and some are more tart. I find that the sweeter the apple the more they brown. I personally don’t mind at all if they brown a little because I don’t think it has any affect on the taste. If you really don’t want them to turn color you can put them in a lemon or salt water solution for about 10 minutes, and then place them on te dehydrator.

Step one: Use a good chef knife for apples. You will notice that I use a different knife for some of my fruit. If you are having problems cutting, just remember that practice makes perfect, its a great way to work on your knife skills.

Step two: Remember not to leave any skin on the top or the bottom of the fruit. There skin is there to protect the fruit and it does a great job of keeping the moister inside.


Step three: I cant give you an exact measurement on how thick to cut them. The thicker they are the longer they will take to dry but its all the same in the end.  Just look at the pictures and the video to get a good idea.


Step four: I usually put my dehydrators outside. I have never had any issues with bugs, I think it gets to hot in there for them to even try getting in. It is also much more quiet that way. When the house starts to get cold, later in the year, I bring it inside to help out.


Step five: You will know they are done when they come off easily from the tray. This might take about 7-10 hours. I usually start mine early in the day or late in the evening. Don’t worry about over-drying. If you start yours in the middle of the day you can leave them over night and just lower your temperature to the lowest setting (if you have temperature control).

I have some pictures and some video on this post. I hope that the video format does not give you guys too many issues. Hope you have a fun and let me know if you have any questions.